Part 1: Acquiring Strain Gauges
After some Googling and ebaying, I found strain gauges or pressure sensors either come in tiny or extra large, 1-3 pound range or industrial strength. All were too expensive. Then I realized digital bathroom scales must have something to measure weight. And since they're designed to both precisely measure human weights and not break under the heaviest of people, they are perfect. A quick search revealed digital bathroom scales going on eBay for a dollar.
 |
| Kilograms only? Good enough! |
It is supported by the side prongs. Pressure is applied on the top of the middle prong.
Part 2: Analysis
Electrically, they look like a potentiometer.
The outer blue and white wires measure a constant resistance, in this case 2 kOhms, while the middle red wire is the wiper, with roughly 1 kOhm resistance between the red and blue wire and the red and white wire. Pressing the gauge is equivalent to turning the potentiometer, though only a very slight amount. When five volts was applied to the outer wires, the middle wire deviated by about 4 millivolts over the range of 100-ish pounds. Since I had four, I used two pairs, one pair each for the left and right side. The power supply for each pair was put in opposition, so pressing on a pair of strain gauges causes one output voltage to go up, and the other to go down.
 |
| Left strain gauge/potentiometer goes up under pressure, right side goes down. |
Electrically, it forms a wheatstone bridge. Measuring the voltage across the outputs gives a reading that varies linearly with pressure applied.
 |
| A wheatstone bridge. Voltage is measured in the middle. |
 |
| The two strain gauges fully connected. Remember, one is connected upside down to get a differential voltage. |
Part 3: Using Them
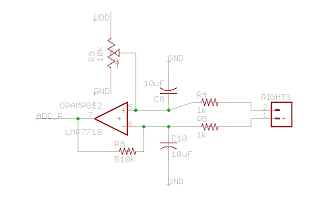
The tiny voltage difference needs to be beefed up. In comes a differential amplifier!
 |
| One channel of the differential amplifier with zero point adjustment and low pass filters. The Velociryder uses two, for the right and left side. |
Protips
Since the op-amp will likely be used in single supply (unipolar) mode, use a rail to rail op-amp so the output won't crap out near 0 and 3 volts.

